All features / Drawing & coloring
Colour freely inside the shape on the layer below
With a clipping mask the upper layer shows only where the lower layer has content. The stencil and the colour stay on separate layers, so you can repaint one without touching the other.
WORKFLOW
How it fits your workflow
Two layers instead of one
Change colour without redrawing the outline
Add more clipped layers for separate shadows
Practical details before you begin
Draw the base shape on a normal layer, create a new layer above it, select the upper layer and click Clipping Mask. Paint there freely — the colour appears only inside the shape below, including its semi-transparent edges.
Colour must sit above the stencil. Before releasing the mask, remember that strokes hidden outside the shape will reappear. If a blank result appears, check that the lower shape has visible content.
PRACTICAL GUIDE
How do I colour a shape and still change its palette later?
Draw the base shape on a lower layer with transparency around it, create a new layer above, select it and click Clipping Mask. Brush shadows, highlights and texture on the upper layer — the colour appears only inside the shape, including its semi-transparent edges.
Everything looks empty. What should I check?
That the upper layer is selected, the mask is on, and the lower shape has visible content. An empty stencil makes the upper layer look blank; colour must sit above the stencil.
Clipping mask or Alpha Lock?
Use Alpha Lock to add detail to one existing patch of colour. Use a clipping mask when the palette may change later or when shadows and texture should sit on separate layers. Before releasing it, note that hidden strokes outside the shape reappear.
STEP BY STEP
How to use it in the software
Clipping Mask: colour inside the shape below
Two clear sheets
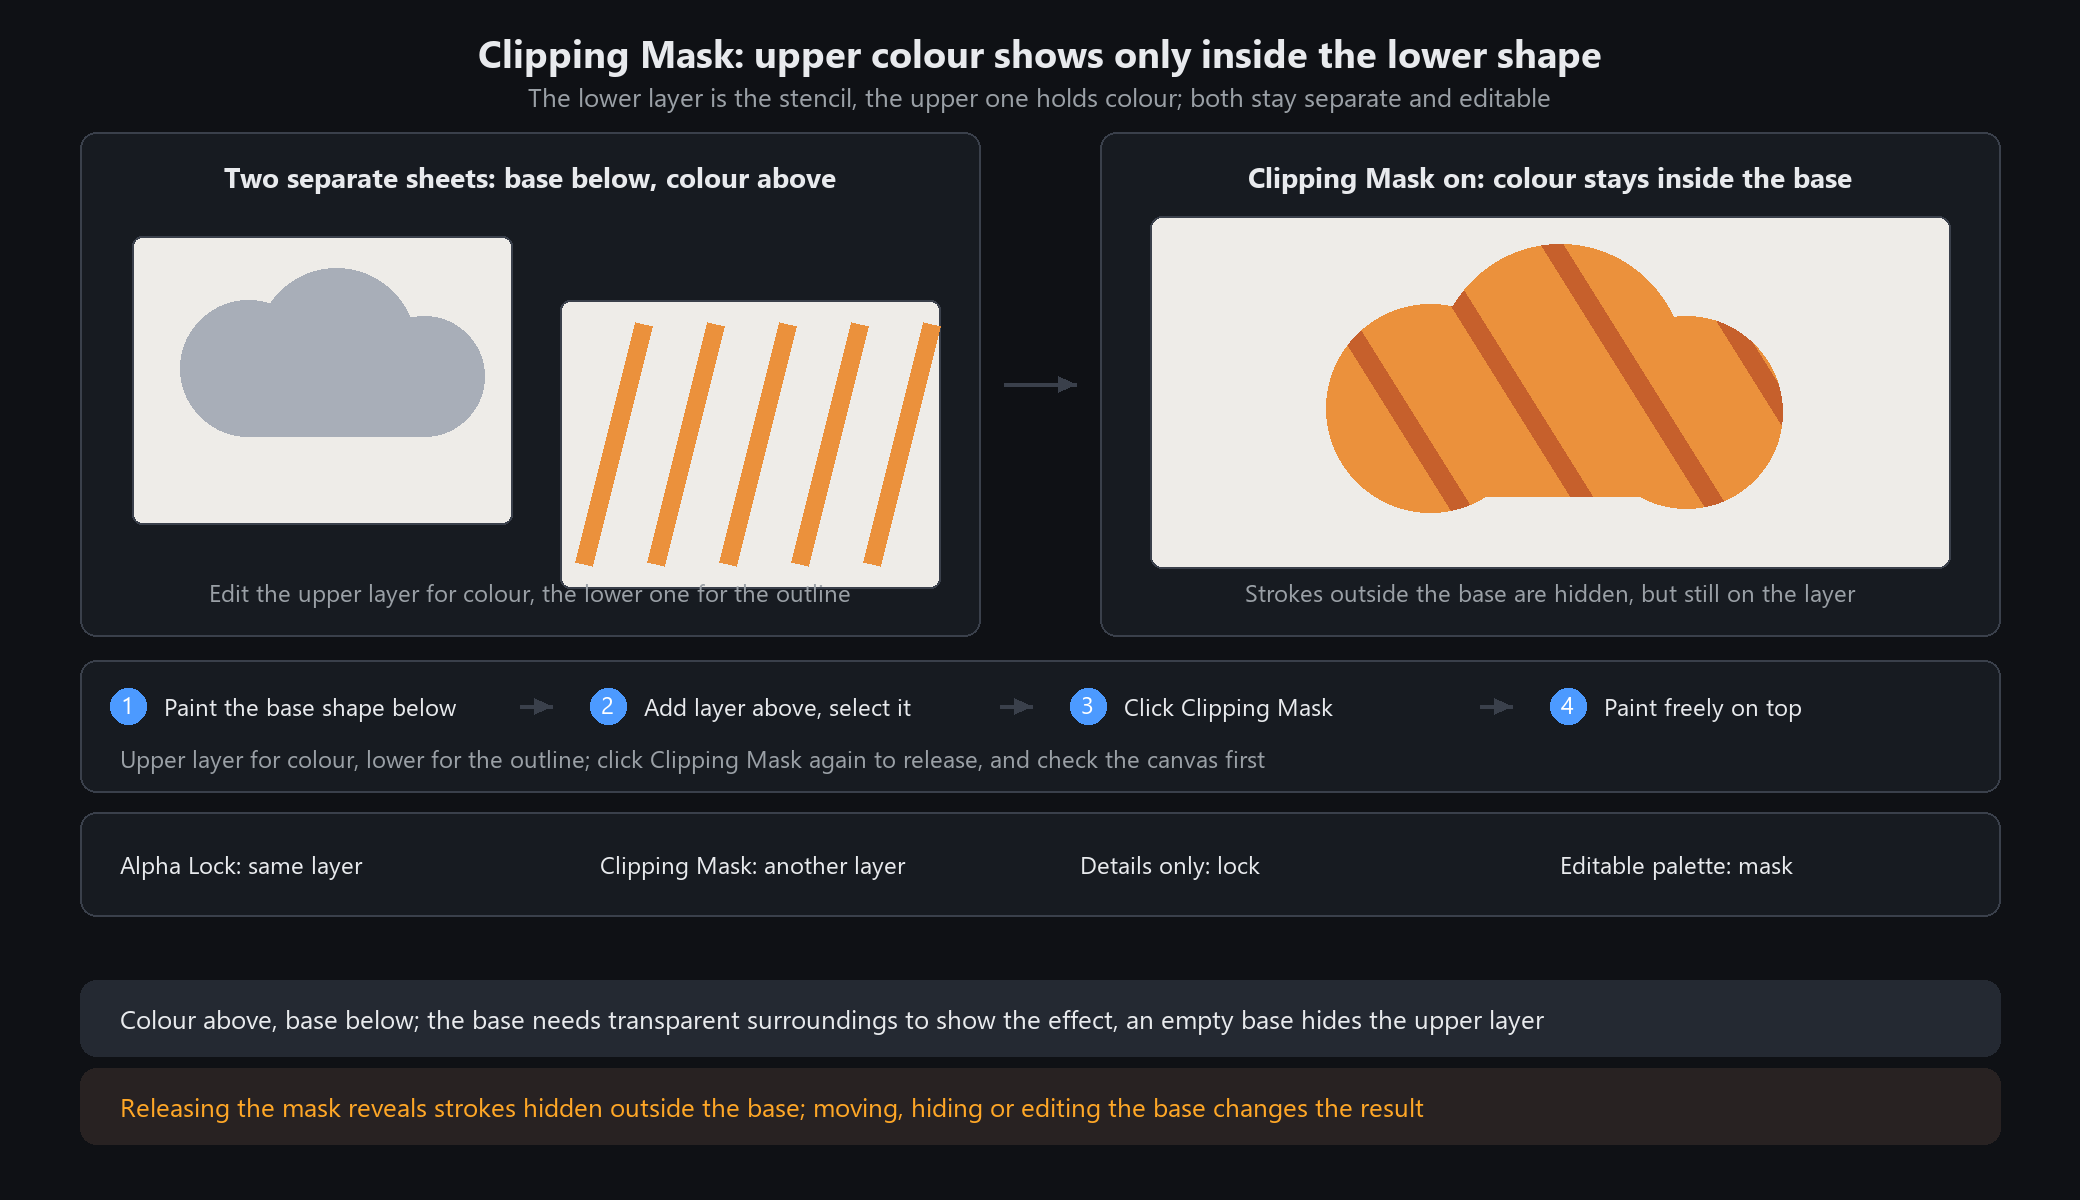
The lower layer is a stencil, the upper one holds colour. With a clipping mask the upper layer appears only where the stencil below has content; paint outside it is hidden. The layers stay separate, so editing colour does not touch the outline.
Five steps
1. Paint a base shape on a regular lower layer (a shirt, cloud or lettering). Transparent surroundings make the effect obvious.
2. Add a layer above, select the upper one and click Clipping Mask in the layer toolbar. The button needs a layer below.
3. Paint shadows, highlights and texture freely on the upper layer. Colour stays inside the visible base shape, including its soft transparent edge.
4. Edit the upper layer for colour, the lower one for the outline. Stack more clipped layers above for separate colour passes.
5. Click Clipping Mask again to release it. Check the canvas first: paint hidden outside the base becomes visible again.
Clipping Mask or Alpha Lock?
Alpha Lock: same layer; colour can only land on pixels that already exist, so outline and colour stay tied together.
Clipping Mask: another layer; the lower layer defines the boundary, and shadows, texture and colour can each live on their own layer.
Rule of thumb: adding detail to one finished colour → Alpha Lock. Keeping the palette editable later → Clipping Mask.
If nothing appears
Is the upper layer selected and Clipping Mask on?
Does the lower base contain visible content? An empty base hides the upper layer.
Is the order right: colour above, base below? Moving, hiding or editing the base changes the result.
STEP BY STEP
Feature 13 · Clipping Mask
Need exact settings and steps? Read the matching chapter of the in-app manual online.