All features / Batch image processing
Batch image processing for Windows
Resize, compress, convert and watermark groups of images without repeating the same steps for every file. Review input and output settings before running a job.
WORKFLOW
How it fits your workflow
Process a folder of images together
Keep output separate from originals
Review failures and results after processing
Practical details before you begin
Collect the images that need the same treatment and choose a separate output folder. This keeps originals available if you need another size, format or quality setting later.
Run one operation first on a small sample when the files vary in dimensions or transparency. Then review the results and any failures before applying the settings to the full set.
STEP BY STEP
How to use it in the software
What batch processing does
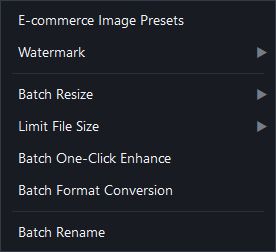
The Batch menu groups commands by purpose:
Format conversion: turn a set of images into another format
Resize: maximum dimensions, fixed width or height, exact dimensions, or a padded canvas
File-size limits: compress alone, or limit both dimensions and file size
E-commerce fit: standardise dimensions and padding for product photos
Watermark / auto beautify: apply one mark or look to a set of photos
Batch rename: changes the selected files' names. Check the folder and naming rule first
Most image operations write to a separate output folder; rename changes the original filenames. Review the confirmation screen before running
Three things before running a batch
1. Test on two or three first: one landscape, one portrait, one square. Run the full batch only when happy
2. Check the output folder: image operations usually create one; read any same-name-folder warning before continuing
3. Back up before renaming: rename changes the original filenames. Check the preview and numbering rule
Cancelling
You can cancel mid-run. Files already processed are kept; the rest are skipped.
Hundreds of images take a while, and a progress bar is shown. Do not start another heavy job at the same time
Batch watermark settings
Position: pick one of nine anchors. Bottom-right is the usual choice
Size: a percentage of image width. 5~10% works well
Opacity: 30~50%. Higher obscures the picture; lower does not deter copying
Text or an image logo both work
A watermark exists to say whose image this is, not to hide the image.
Watermarks covering the subject get ignored and spread nothing
STEP BY STEP
Batch processing
Need exact settings and steps? Read the matching chapter of the in-app manual online.